

Hey folks! Recently we put out this video (also shown below) showing off our new touch screen features, and it’s safe to say it was quite popular! In this article we’ll be giving you instructions on how you can build your own version of this setup at home. Product links in this article are affiliate links.
TLDR Links:
Touch overlays for TV-s or Monitors:
Touch software:
Arkenforge Touch Client: https://arkenforge.com/arkenforge-touch-client/
VTT:
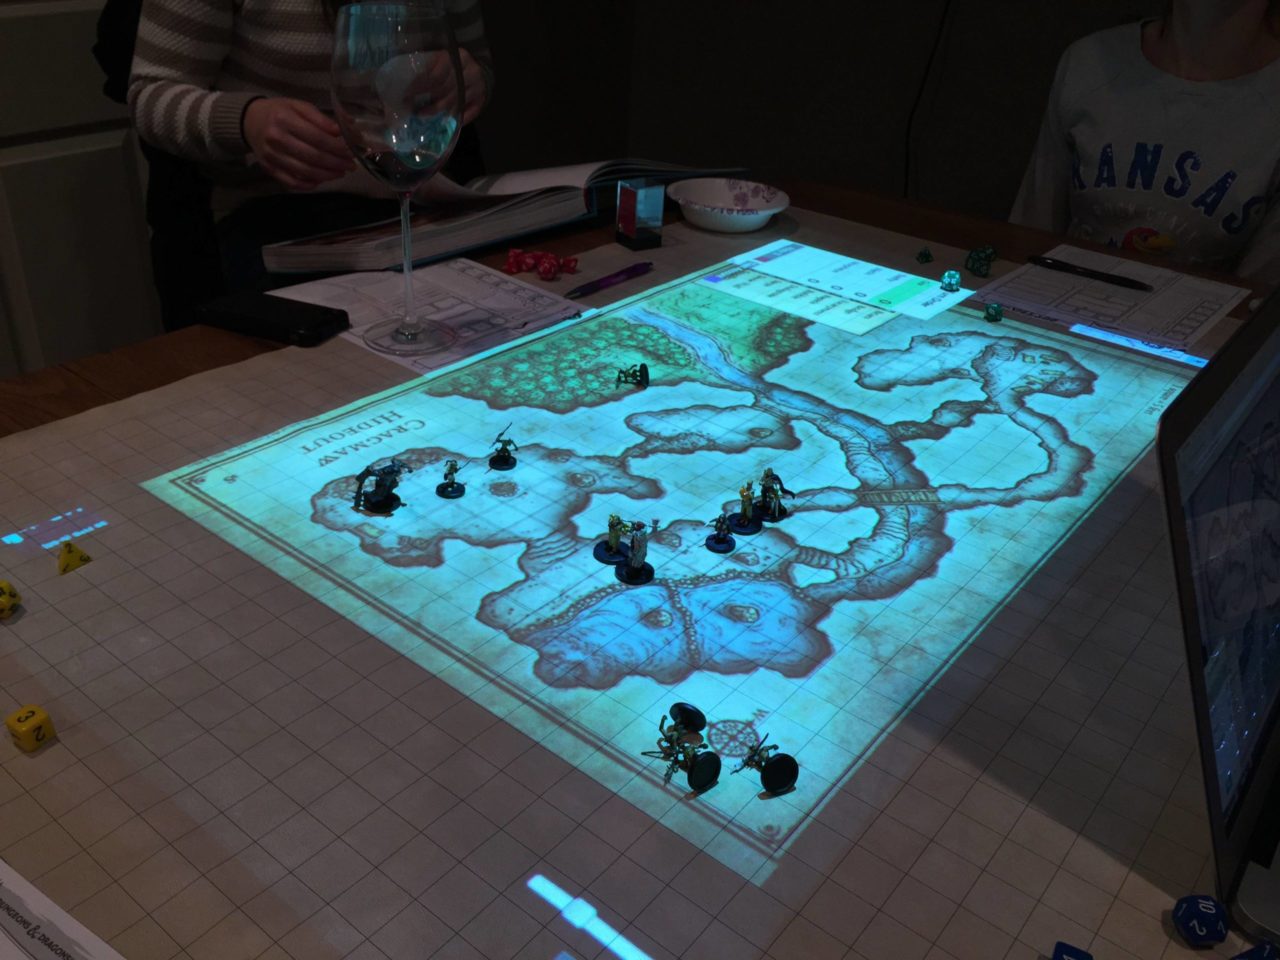
Map Display
The first thing we’ll need to organise is a way for your players to see the map. There’s three main ways to go about this, depending on your budget and available space. We’ll start with the cheapest/least space required and go up from there.
Horizontal-Mounted TV
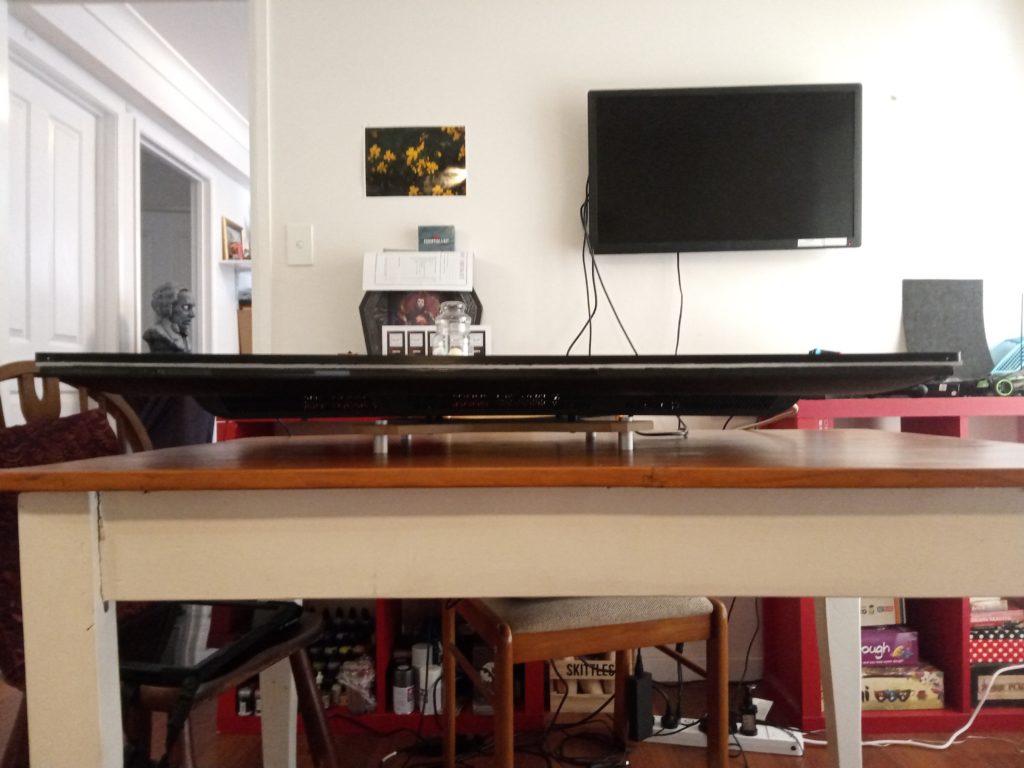
The easiest way to get a digital setup up and running is to take an existing TV and lay it flat on your table. If your TV doesn’t have a flat back or you want something a little sturdier, you can design a mount that screws into the back of it to keep it flat. The image above shows one that we’ve designed for use at conventions and our home games.
Projector
If you’ve got a sturdy roof and don’t mind doing some wiring, a roof-mounted projector may be for you. This allows for any surface to be used for your play area. Minis with overhanging elements may cause shadows on the map, but arguably that just adds to the immersion.
Integrated Digital Table
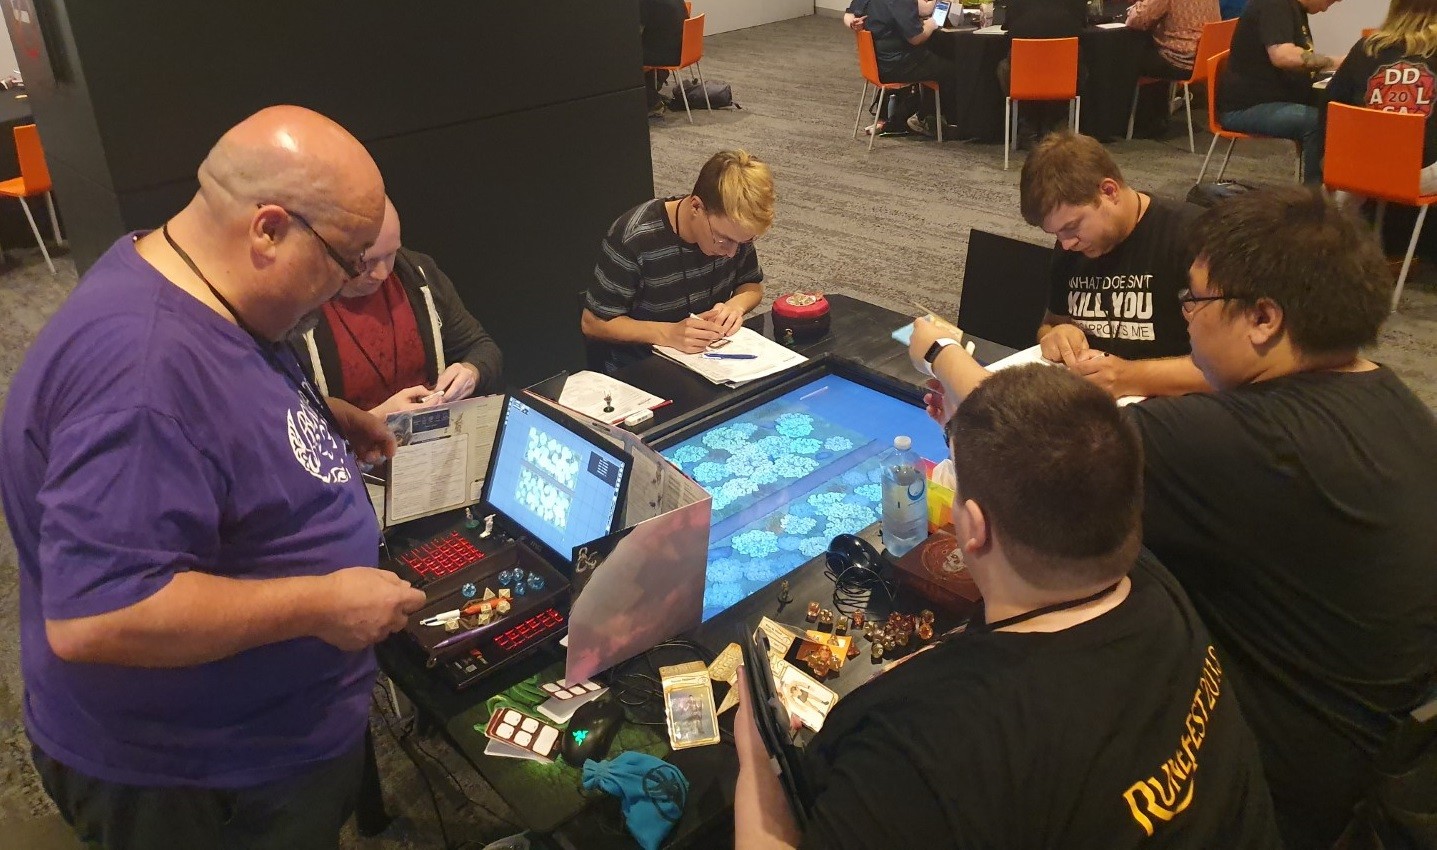
This is the big one; a TV built directly into a table! These can range from a few hundred dollars to tens of thousands depending on the features and craftsmanship. The sky is the limit with this setup, as you can add speakers, lighting, or even cup holders! Depending on your touch screen solution, the TV will either be flush with the table, or slightly recessed. If you aren’t confident to chop up a table yourself, contact your local carpenter, or one of the many companies creating ready-made digital tables.
Now that our players are able to see the map, our next step is to make it interactive!
Touch Screen Options
The most important part of this build is the thing that will actually be detecting your minis. There’s two main types of touch screens you’ll want to consider: capacitive and infrared. The touch technology you use will determine if there’s anything else you’ll need to get your setup up and running.
Infrared Overlays
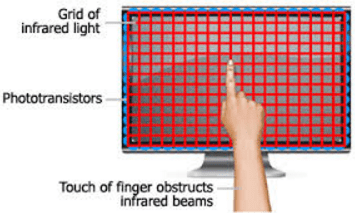
IR Overlays work by firing out infrared light in a grid pattern and registering a touch point where the grid is broken. They’re cheap, relatively accurate, and they can detect any object that you put in the middle of them. We personally like these because it can detect any mini right out of the box. There are a solid list of cons though, depending on how you like to run your sessions.
Because the detection is done from the frame inwards, objects that the IR beam can’t hit won’t be detected. This can be noticed when clumping minis together, or if some unfortunate positioning leaves a mini in a dead zone. As the frame detects everything that enters it, dice rolls or accidental droppage can cause unintended reveals. This is something we will address with future versions of the Arkenforge Toolkit. An IR Overlay also doesn’t play nice with 3D terrain, so you may want to opt for a different solution if you enjoy busting out the Dwarven Forge dungeons. Finally, if you play somewhere with large amounts of IR light, your touch screen may have detection issues.
You can purchase IR overlays in various sizes to fit your screen. We’ve selected a few below for common screen sizes:
Capacitive Touch Screen
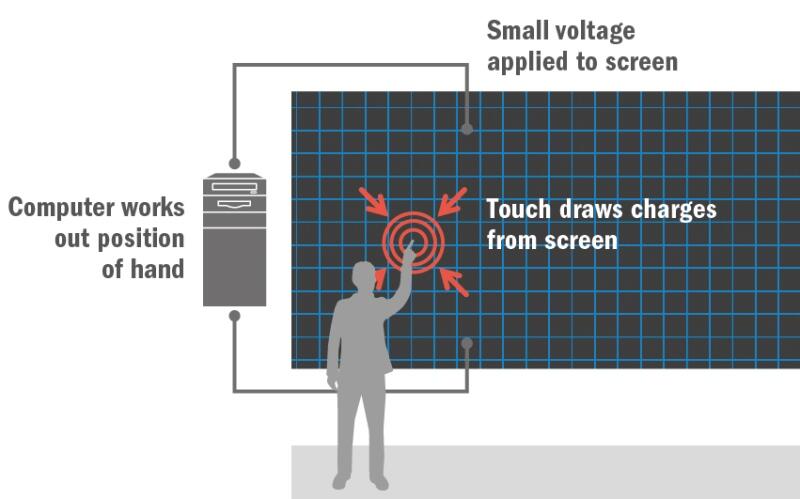
These screens are the ones we find in nearly every device today. They detect touch input by sensing when an electrically conductive material is applied to them. This is usually your finger or a stylus. There is no risk of blocking your minis, as the source of detection is the screen itself. There’s also no risk of interference from other light sources, meaning they can be used in all conditions.
While capacitive screens solve a lot of the issues that IR touch screens can face, there is extra cost and work involved in preparing your minis for detection. The main downside of these devices is that standard mini bases are made of plastic, and therefore are not conductive. You’ll need to find custom bases with a capacitive material, usually involving copper or aluminium. Aluminium foil can often work in a pinch, but results can be iffy. As a general rule of thumb, if it works on your smartphone, it’ll work on your screen. As capacitive touch screens put you in charge of what does and doesn’t get detected, you can safely use 3D terrain on these screens.
Capacitive screens can be purchased both as a full unit, or as a film that you can place on your existing TV. You can find one such film below:
If you aren’t too big on the DIY side of things, you can increase your budget a bit and go for an already integrated capacitive touch screen:
40-inch capacitive touch screen
Once your screen has been organised, the next thing you’ll need is the software to run it!
Software
At this moment in time, there’s two pieces of software you’ll need to get your touch screen up and running. Our first version of this feature requires two devices, one of which must be running Windows. There’s no spec requirements for this second device. It just needs to be able to connect to WiFi. As time goes on, we’ll be working to get the second device to a much cheaper price point and more convenient size.
The Arkenforge Toolkit
This is the most important part of your setup! Right now the Toolkit interprets all touch points as vision to reveal. In the future we’ll be performing some software wizardry to allow selective touch reveal, touch dead-zones, and a bunch of other fun features.
In the first release of this feature, we’ve got some simple options available. For a full overview, check out our sister article that explains how to use and configure the Arkenforge Touch Client: https://arkenforge.com/arkenforge-touch-client/
Arkenforge Touch Client software
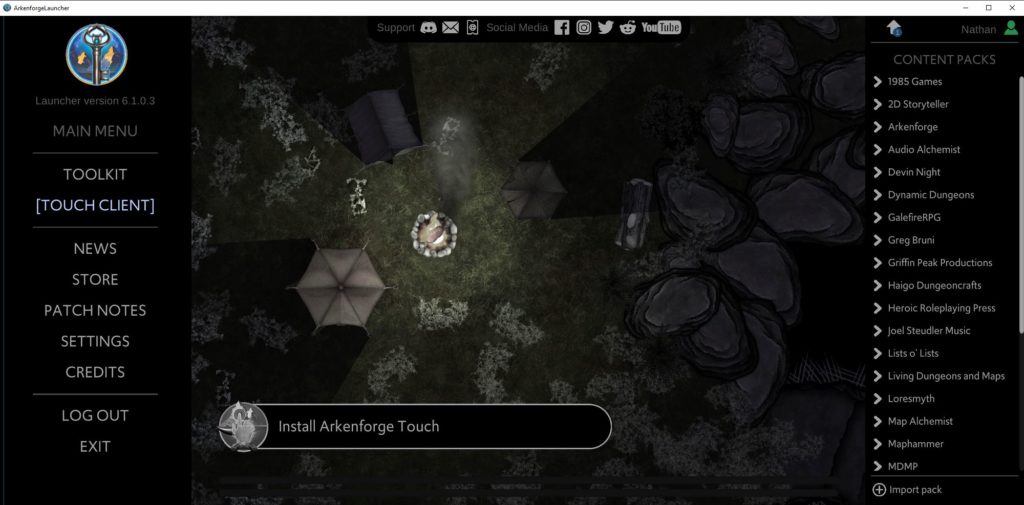
Those of you on Windows may have noticed a new option in your Launcher – Touch Client. This software runs on a Windows device connected to your touch screen. Some of you may be wondering: “Why do I need a second device + software to use the touch screen? Can’t I just plug it into my main computer” That’s a pretty valid question. The primary reason is that touch input steals control of the mouse. This stops the Toolkit from being useable once minis are in play, and can lead to a lot of unintended UI selection. Another fun fact is that most touch devices clear ALL touch points if it detects a point for more than 60 seconds. This is counterproductive when dealing with minis that are often on the board for hours at a time.
For this reason, we created the Arkenforge Touch Client software to send touch information to the Toolkit over the local network. The only thing you need to do is run the software. It’ll automatically connect to the Toolkit and handle everything from there. One other benefit of having an external app is that the Toolkit can remain platform independent, so whether you’re running on PC, Mac, or Wine, you don’t need to worry about drivers or compatibility issues. For a full overview of the Arkenforge Touch Client, view our sister article here: https://arkenforge.com/arkenforge-touch-client/
Integrating other devices with the Toolkit fog of war
For those who want to perform your own fun fog of war integration, the Toolkit receives fog data via OSC. Port 7001, Address “/FogOfWarPosition”. Data will need to be in the string format “[touch point]|[x position]|[y position]”, where [touch point] is an integer from 0 – 99, [x/y position] is a decimal value from 0 – 1 representing the screen position, and ‘|’ is the separator character.
Enjoy your new setup!
You’ve now got everything you need to get a touch screen setup up and running! If this feels like a bit too much work, we’ll be looking to release a kit that contains everything you need in the future. Be sure to stay on the lookout for that!
If you don’t have the Arkenforge Toolkit yet, try it free for 30 days at https://arkenforge.com/
See you in the next one! 🙂
I purchased a capacitive touch screen above and it came with no instructions or software. I have reached out to the seller and am waiting to hear back. Can you send me whatever instructions/software you received?
Hey there!
I’m afraid we can’t provide any solid support for third party hardware.
So, you mention that two devices are needed. One that runs Windows for your software (my notebook computer) and another device that connects to Wifi. What type of device, that connects to Wifi, Rasberry Pi? There’s not much explanation and no examples. Could you please provide more examples or links to them?
One other question. Often my maps are bigger than my 32 inch second monitor, especially when the grid is scaled to be roughly an inch on the display. What happens when the map has to be moved and the mini’s don’t move?
Currently you will need to disable touch input in the Toolkit, move your map, then re-enable touch input.
The device running the Touch Client must be a Windows device. The device running the Master’s Toolkit can be either Windows or Mac.