Content (1)
See our handy guide here for information on usage rights and commercial publishing: https://arkenforge.com/commercial-publishing/
Macintosh Launcher (10)
Minimum requirements :
Processor : Dual-core processor (64bit architecture)
GPU : Dedicated, possibly gaming capable graphics card : Nvidia GTX 700 series and up / AMD Radeon R7 series and up
RAM : 4GB
Recommended :
Processor : Quad-core processor (64bit architecture)
GPU : GTX 900 series and up / AMD Radeon R9 series and up
RAM : 8GB
Currently we support Paypal only.
As of Version 1.1, the Packs folder is located inside the PackCreator App. The easiest way to find it is to grab the install DMG, go to the utilities folder, and run the App that will make a shortcut in your Documents folder. (Thanks Leigh)
This is in a hidden Library folder. You can use Shift+Cmd+G and type ~/Library/Application Support/com.Arkenforge.ArkenforgeLauncher/ArkenforgeData, or, the easiest way to find it is to grab the install DMG, go to the utilities folder, and run the App that will make a shortcut in your Documents folder. (Thank you Leigh)
Step 1: Open Arkenforge Launcher
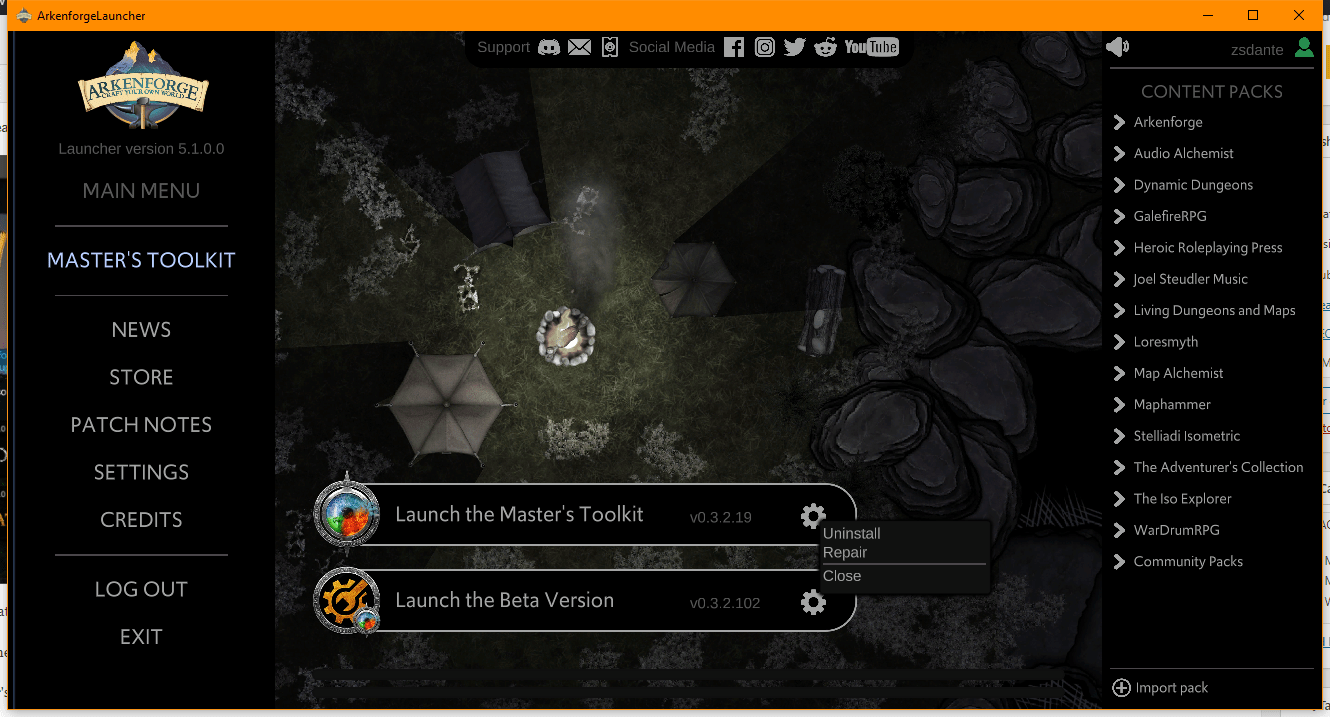
Step 2: Click on the grey gear icon next to the Master’s Toolkit and click uninstall
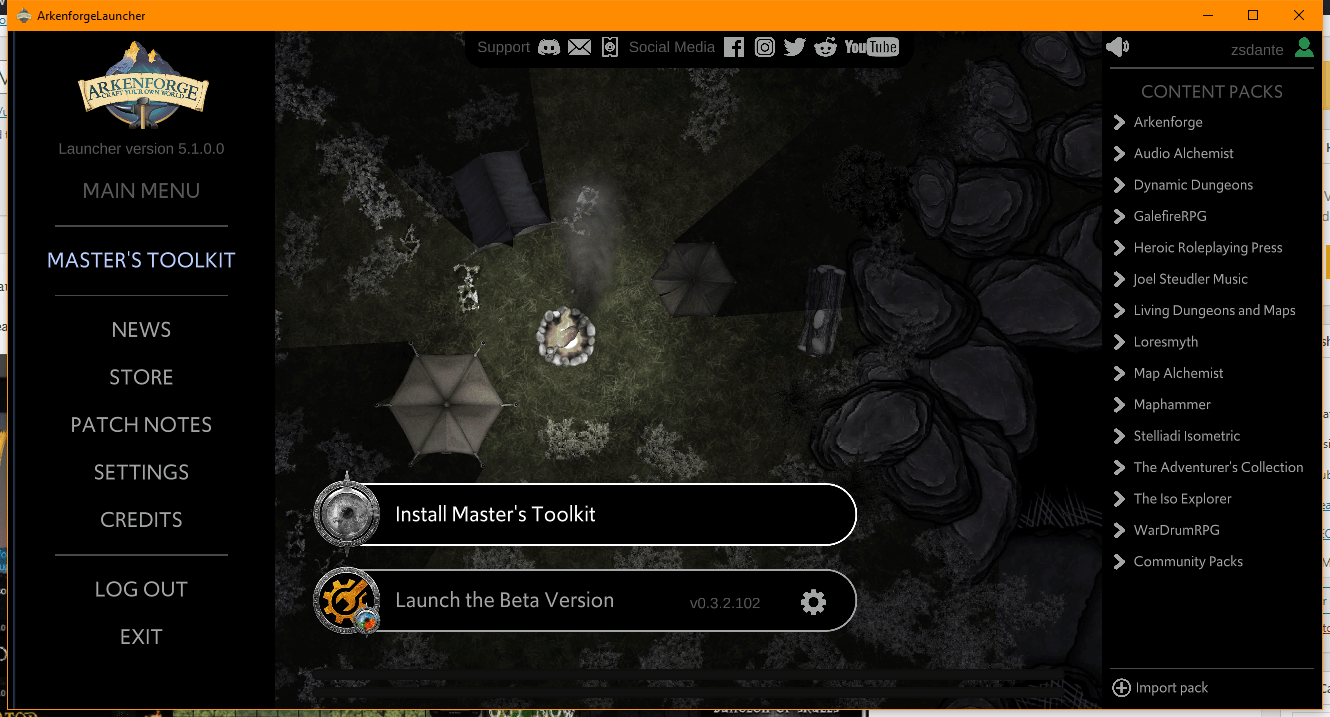
Step 3: Click on the Install Master’s Toolkit button to install
Step 6: Wait until Installation is completed
Importing the custom packs manually into the Master’s Toolkit
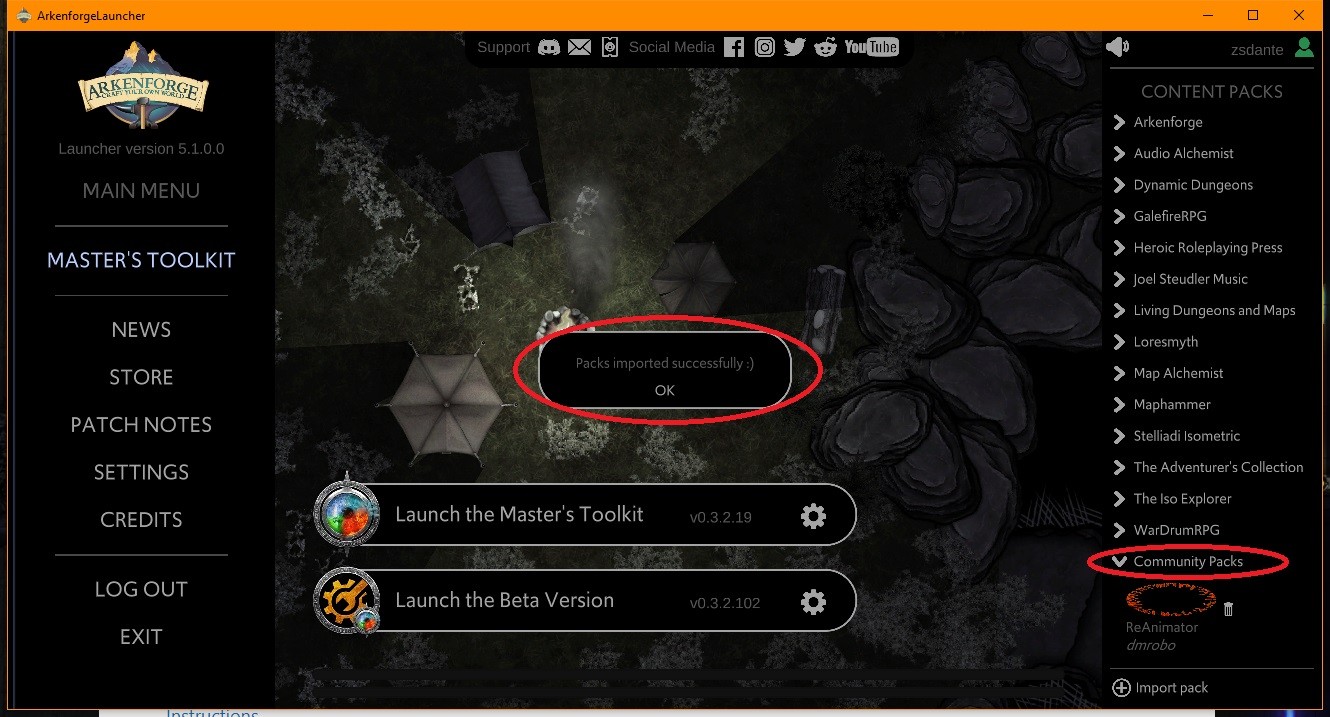
Once our pack is ready, we can import it via the Arkenforge Launcher.
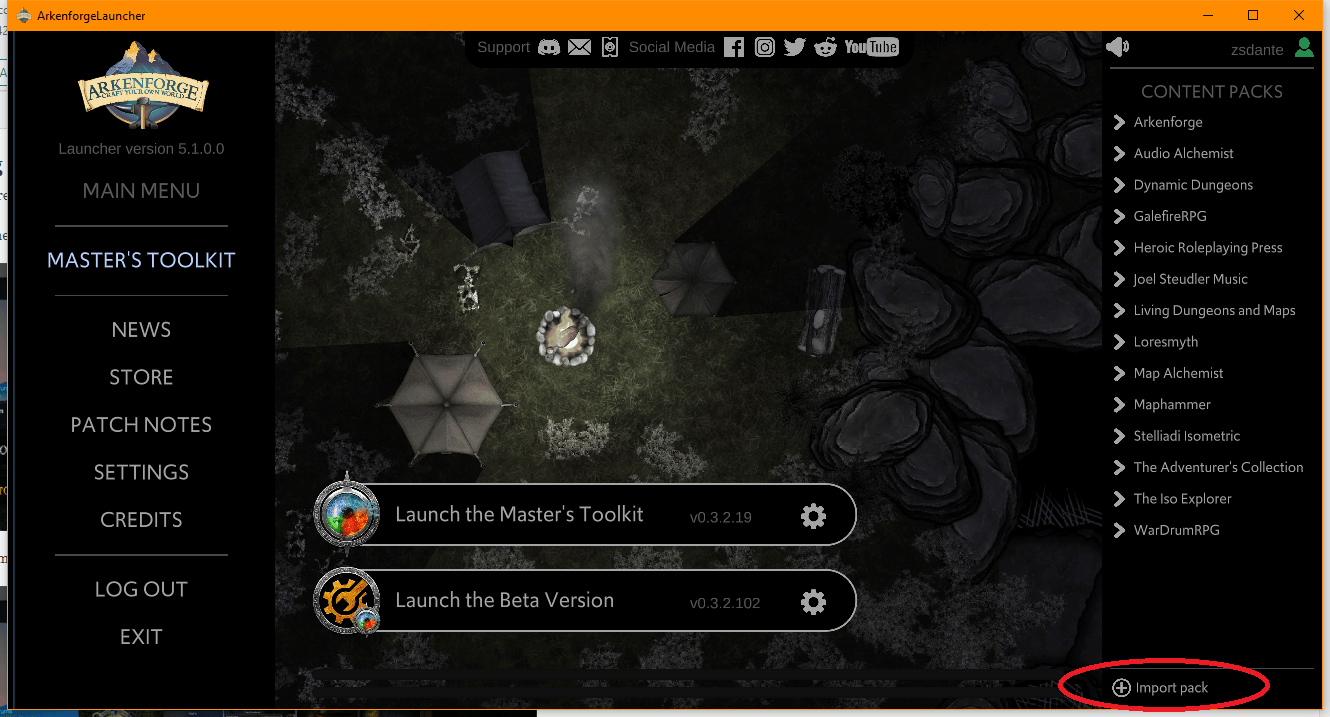
Step 1: Click on Import custom packs on the bottom :
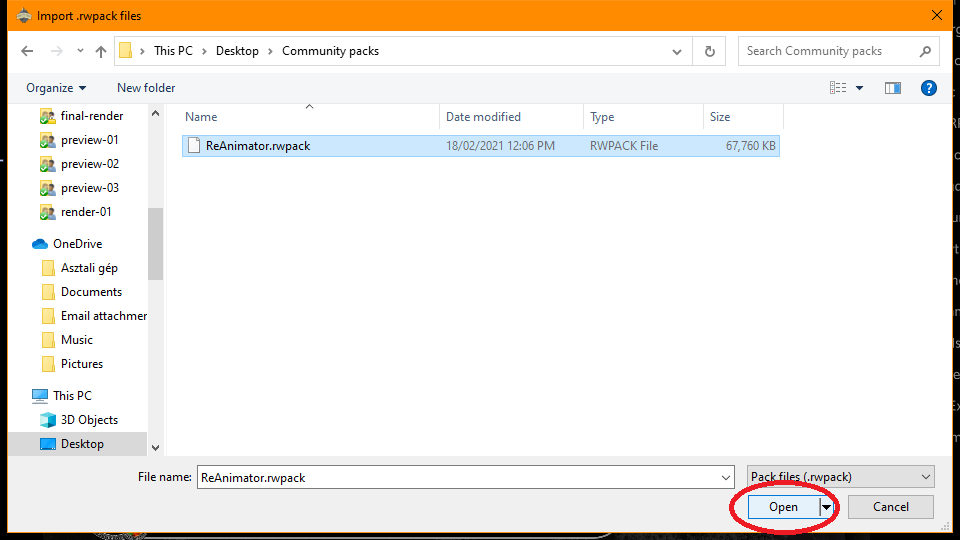
Step 2: If you downloaded Community packs, just navigate to your Downloads folder and select the pack files to import then click Open
Step 3: Check whether your Custom pack shows up in the list, if yes, launch the Master’s Toolkit :
Step 1: Open Arkenforge Launcher
Step 2: Click on the grey gear icon next to the Master’s Toolkit and click uninstall
Step 1: Open Arkenforge Launcher
Step 2: Click on the grey gear icon next to the Master’s Toolkit, and click repair
Step 1: After the purchase open your Launcher (if its already open, close and reopen it).
Step 2: Check whether your purchased pack shows up under the packs section with a black and white image:
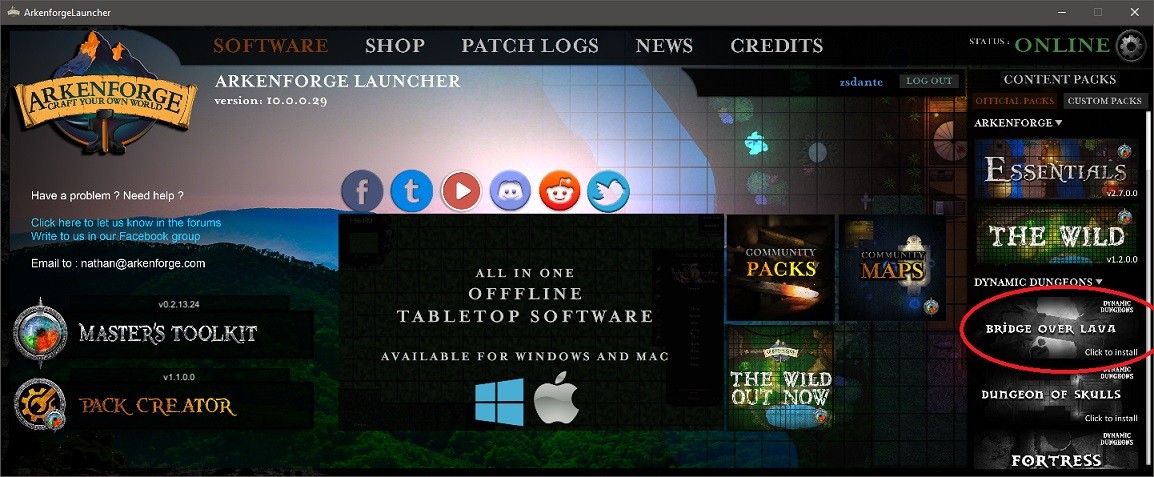
Step 3: Click on the image
Step 4: After the installation, the image will change to the coloured version, indicating that the Pack is ready to use
Masters Toolkit (11)
Minimum requirements :
Processor : Dual-core processor (64bit architecture)
GPU : Dedicated, possibly gaming capable graphics card : Nvidia GTX 700 series and up / AMD Radeon R7 series and up
RAM : 4GB
Recommended :
Processor : Quad-core processor (64bit architecture)
GPU : GTX 900 series and up / AMD Radeon R9 series and up
RAM : 8GB
Currently we support Paypal only.
As of Version 1.1, the Packs folder is located inside the PackCreator App. The easiest way to find it is to grab the install DMG, go to the utilities folder, and run the App that will make a shortcut in your Documents folder. (Thanks Leigh)
This is in a hidden Library folder. You can use Shift+Cmd+G and type ~/Library/Application Support/com.Arkenforge.ArkenforgeLauncher/ArkenforgeData, or, the easiest way to find it is to grab the install DMG, go to the utilities folder, and run the App that will make a shortcut in your Documents folder. (Thank you Leigh)
Step 1: Open Arkenforge Launcher
Step 2: Click on the grey gear icon next to the Master’s Toolkit and click uninstall
Step 3: Click on the Install Master’s Toolkit button to install
Step 6: Wait until Installation is completed
Importing the custom packs manually into the Master’s Toolkit
Once our pack is ready, we can import it via the Arkenforge Launcher.
Step 1: Click on Import custom packs on the bottom :
Step 2: If you downloaded Community packs, just navigate to your Downloads folder and select the pack files to import then click Open
Step 3: Check whether your Custom pack shows up in the list, if yes, launch the Master’s Toolkit :
Step 1: Open Arkenforge Launcher
Step 2: Click on the grey gear icon next to the Master’s Toolkit and click uninstall
Step 1: Open Arkenforge Launcher
Step 2: Click on the grey gear icon next to the Master’s Toolkit, and click repair
Not at this stage. The Masters Toolkit is a fully offline platform designed for in-person digital games.
Nope! 😀
We don’t believe that you should pay more than once for something you already own, so there’s no subscription fees or premium features.
All future content updates will be automatically added to your Toolkit
Windows launcher (11)
Due to the risks of patching large files and getting a threading error (a Unity issue which still occasionally pops up) we decided that we bundle The Master’s Toolkit, Launcher and the Essentials pack into one Installer. This seemed to also resolve a lot of confusion about how to install different components/order of components to users, and we reduced support requests on this topic close to zero. We understand that it is a fairly large download comparing to a single launcher, but being compressed and worked into one installer file, it is a lot faster process than letting the launcher download and install software/pack separately.
Minimum requirements :
Processor : Dual-core processor (64bit architecture)
GPU : Dedicated, possibly gaming capable graphics card : Nvidia GTX 700 series and up / AMD Radeon R7 series and up
RAM : 4GB
Recommended :
Processor : Quad-core processor (64bit architecture)
GPU : GTX 900 series and up / AMD Radeon R9 series and up
RAM : 8GB
Currently we support Paypal only.
Step 1: Open Arkenforge Launcher
Step 2: Click on the grey gear icon next to the Master’s Toolkit and click uninstall
Step 3: Click on the Install Master’s Toolkit button to install
Step 6: Wait until Installation is completed
Step 1 : Purchase the Master’s Toolkit if you haven’t already here : https://arkenforge.com/product/the-masters-toolkit-public-alpha/
Step 2 : Purchase and download the installer for the Windows launcher from our website here: https://arkenforge.com/product/masters-toolkit-alpha-version/ . If you have purchased the product and downloaded the installer but havent installed for about a month or so, we suggest re-downloading the installer, because as we update the software, we also updtate the installer, so you dont end up waiting a long time downloading small patches. To download the installer again, head to : https://arkenforge.com/my-account/downloads/.
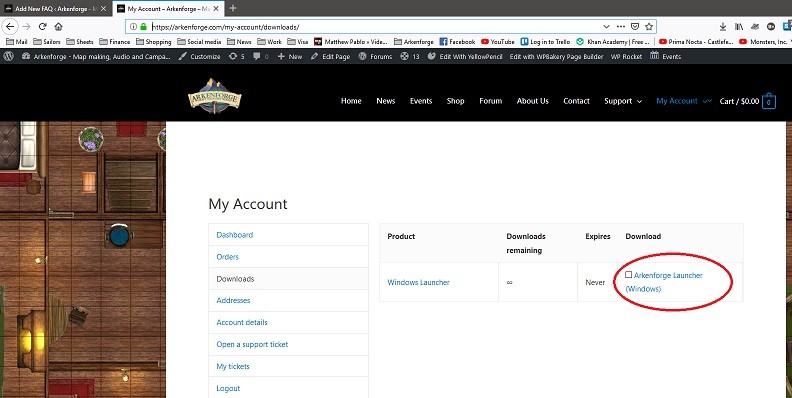
Step 3 : Doubleclick on the downlaoded file to start the installation process :

Step 4: Walk through the steps of installation
Step 5: Search for Arkenforge on your start menu with Cortana, right click it, and run as administrator
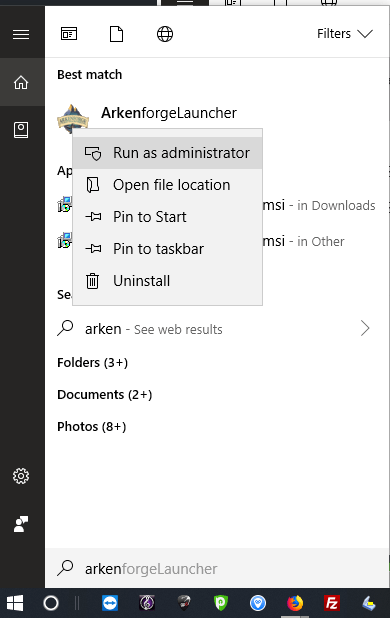
In the future you can avoid clicking running in administrator mode every time by doing this : https://arkenforge.com/ufaqs/how-do-i-run-the-launcher-as-admin-windows/
Depending on your instalaltion folder’s permission, you might have to run the launcher in administrator mode every time it needs to patch.
Importing the custom packs manually into the Master’s Toolkit
Once our pack is ready, we can import it via the Arkenforge Launcher.
Step 1: Click on Import custom packs on the bottom :
Step 2: If you downloaded Community packs, just navigate to your Downloads folder and select the pack files to import then click Open
Step 3: Check whether your Custom pack shows up in the list, if yes, launch the Master’s Toolkit :
Step 1: Open Arkenforge Launcher
Step 2: Click on the grey gear icon next to the Master’s Toolkit and click uninstall
Step 1: Download and Install the Arkenforge Launcher, click here to know how!
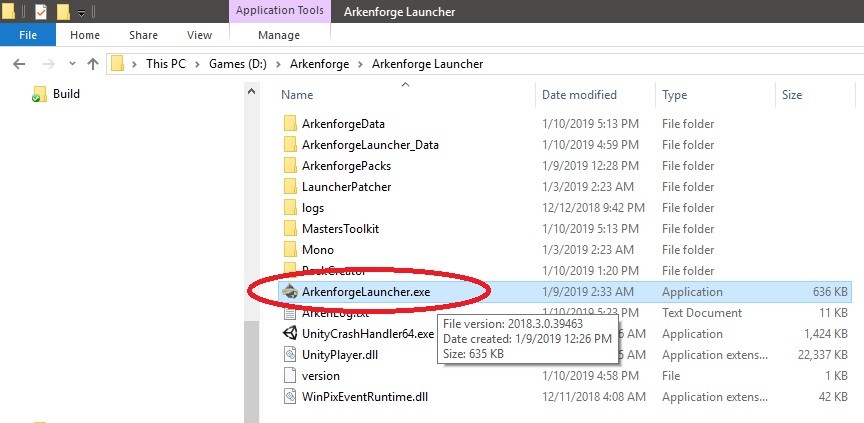
Step 2: Once setup is complete, find ArkenforgeLauncher.exe in the installed directory
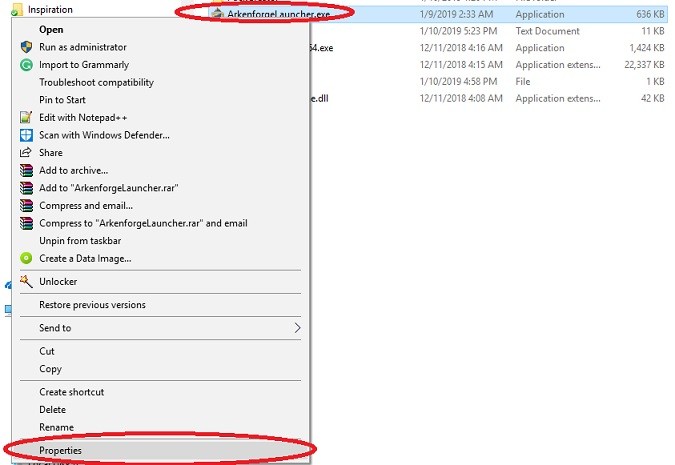
Step 3: Right-click on ArkenforgeLauncher.exe and click on properties
Step 4: Navigate to the Compatibility tab, ensure that ‘Run this as an administrator’ is checked
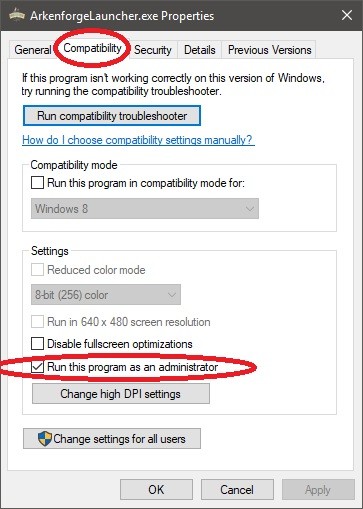
Step 6: Press ‘Apply’ then OK
Step 7: Run the launcher
Step 1: Open Arkenforge Launcher
Step 2: Click on the grey gear icon next to the Master’s Toolkit, and click repair
Step 1: After the purchase open your Launcher (if its already open, close and reopen it).
Step 2: Check whether your purchased pack shows up under the packs section with a black and white image:

Step 3: Click on the image
Step 4: After the installation, the image will change to the coloured version, indicating that the Pack is ready to use
Macintosh Launcher (10)
Minimum requirements :
Processor : Dual-core processor (64bit architecture)
GPU : Dedicated, possibly gaming capable graphics card : Nvidia GTX 700 series and up / AMD Radeon R7 series and up
RAM : 4GB
Recommended :
Processor : Quad-core processor (64bit architecture)
GPU : GTX 900 series and up / AMD Radeon R9 series and up
RAM : 8GB
Currently we support Paypal only.
As of Version 1.1, the Packs folder is located inside the PackCreator App. The easiest way to find it is to grab the install DMG, go to the utilities folder, and run the App that will make a shortcut in your Documents folder. (Thanks Leigh)
This is in a hidden Library folder. You can use Shift+Cmd+G and type ~/Library/Application Support/com.Arkenforge.ArkenforgeLauncher/ArkenforgeData, or, the easiest way to find it is to grab the install DMG, go to the utilities folder, and run the App that will make a shortcut in your Documents folder. (Thank you Leigh)
Step 1: Open Arkenforge Launcher
Step 2: Click on the grey gear icon next to the Master’s Toolkit and click uninstall
Step 3: Click on the Install Master’s Toolkit button to install
Step 6: Wait until Installation is completed
Importing the custom packs manually into the Master’s Toolkit
Once our pack is ready, we can import it via the Arkenforge Launcher.
Step 1: Click on Import custom packs on the bottom :
Step 2: If you downloaded Community packs, just navigate to your Downloads folder and select the pack files to import then click Open
Step 3: Check whether your Custom pack shows up in the list, if yes, launch the Master’s Toolkit :
Step 1: Open Arkenforge Launcher
Step 2: Click on the grey gear icon next to the Master’s Toolkit and click uninstall
Step 1: Open Arkenforge Launcher
Step 2: Click on the grey gear icon next to the Master’s Toolkit, and click repair
Step 1: After the purchase open your Launcher (if its already open, close and reopen it).
Step 2: Check whether your purchased pack shows up under the packs section with a black and white image:

Step 3: Click on the image
Step 4: After the installation, the image will change to the coloured version, indicating that the Pack is ready to use

