Macintosh Launcher (10)
Minimum requirements :
Processor : Dual-core processor (64bit architecture)
GPU : Dedicated, possibly gaming capable graphics card : Nvidia GTX 700 series and up / AMD Radeon R7 series and up
RAM : 4GB
Recommended :
Processor : Quad-core processor (64bit architecture)
GPU : GTX 900 series and up / AMD Radeon R9 series and up
RAM : 8GB
Currently we support Paypal only.
As of Version 1.1, the Packs folder is located inside the PackCreator App. The easiest way to find it is to grab the install DMG, go to the utilities folder, and run the App that will make a shortcut in your Documents folder. (Thanks Leigh)
This is in a hidden Library folder. You can use Shift+Cmd+G and type ~/Library/Application Support/com.Arkenforge.ArkenforgeLauncher/ArkenforgeData, or, the easiest way to find it is to grab the install DMG, go to the utilities folder, and run the App that will make a shortcut in your Documents folder. (Thank you Leigh)
Step 1: Open Arkenforge Launcher
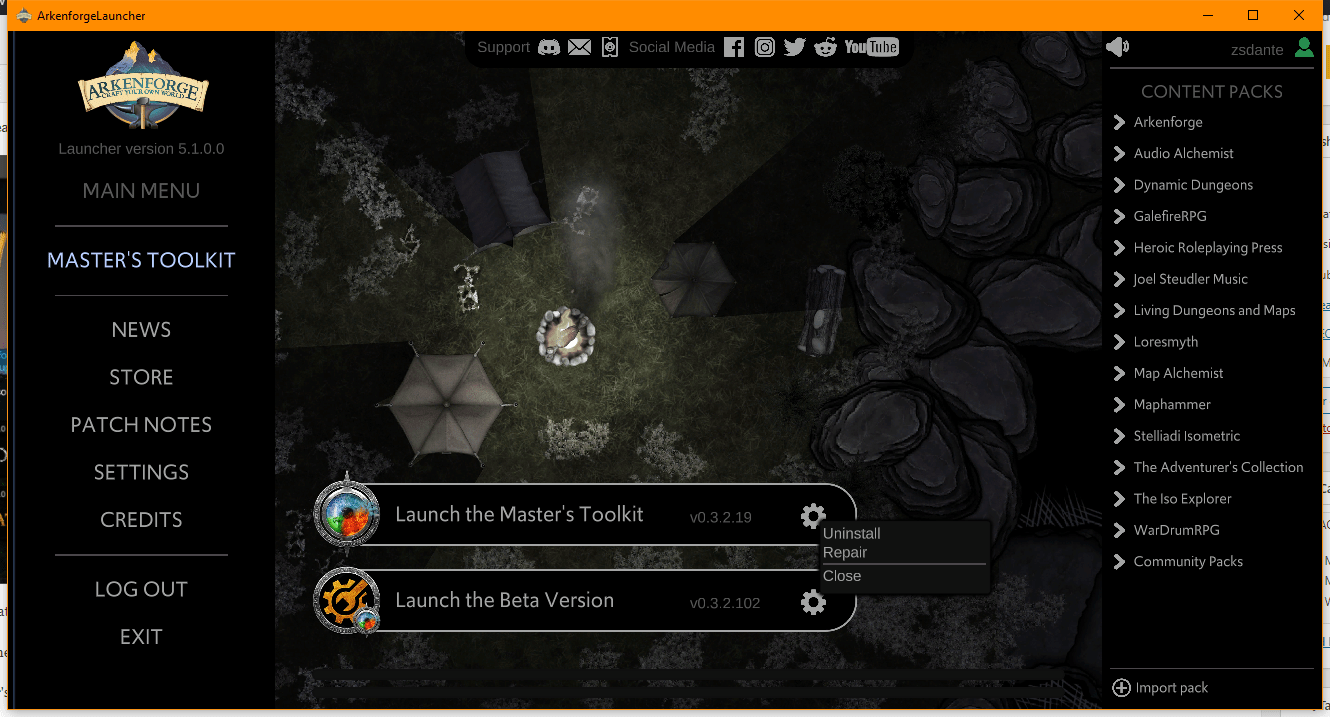
Step 2: Click on the grey gear icon next to the Master’s Toolkit and click uninstall
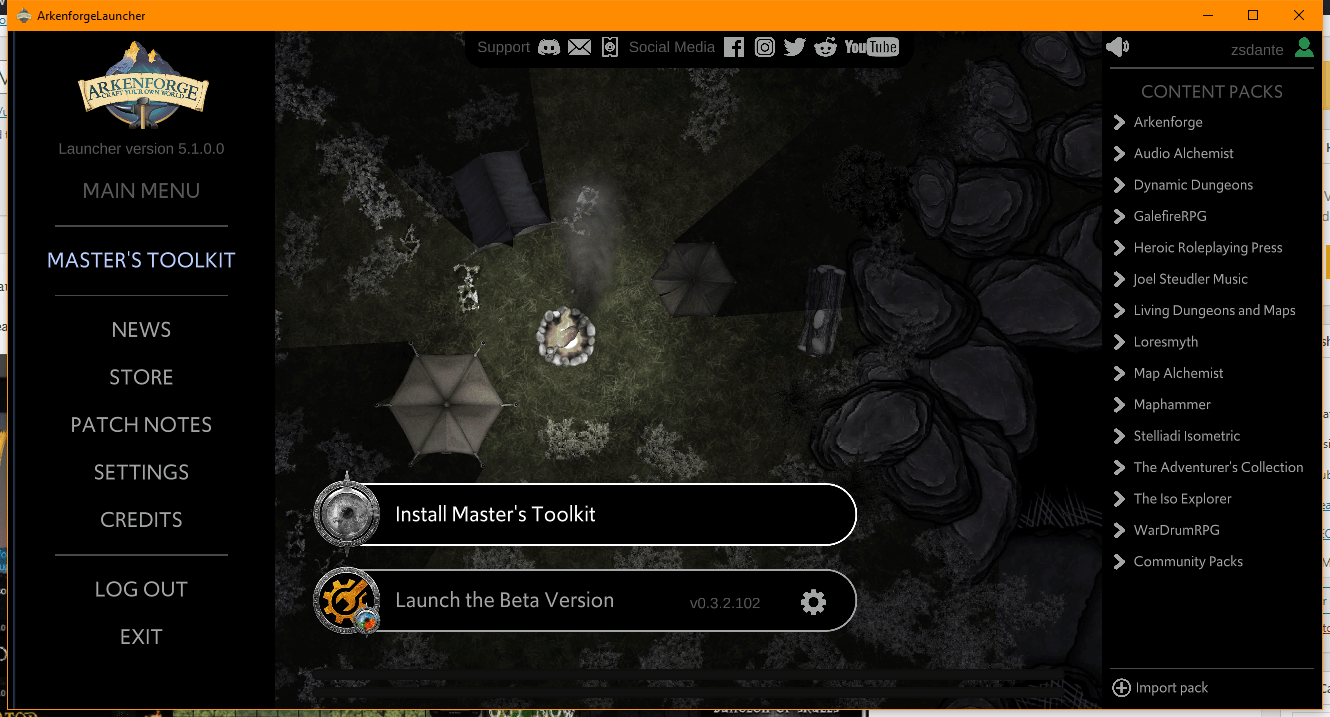
Step 3: Click on the Install Master’s Toolkit button to install
Step 6: Wait until Installation is completed
Importing the custom packs manually into the Master’s Toolkit
Once our pack is ready, we can import it via the Arkenforge Launcher.
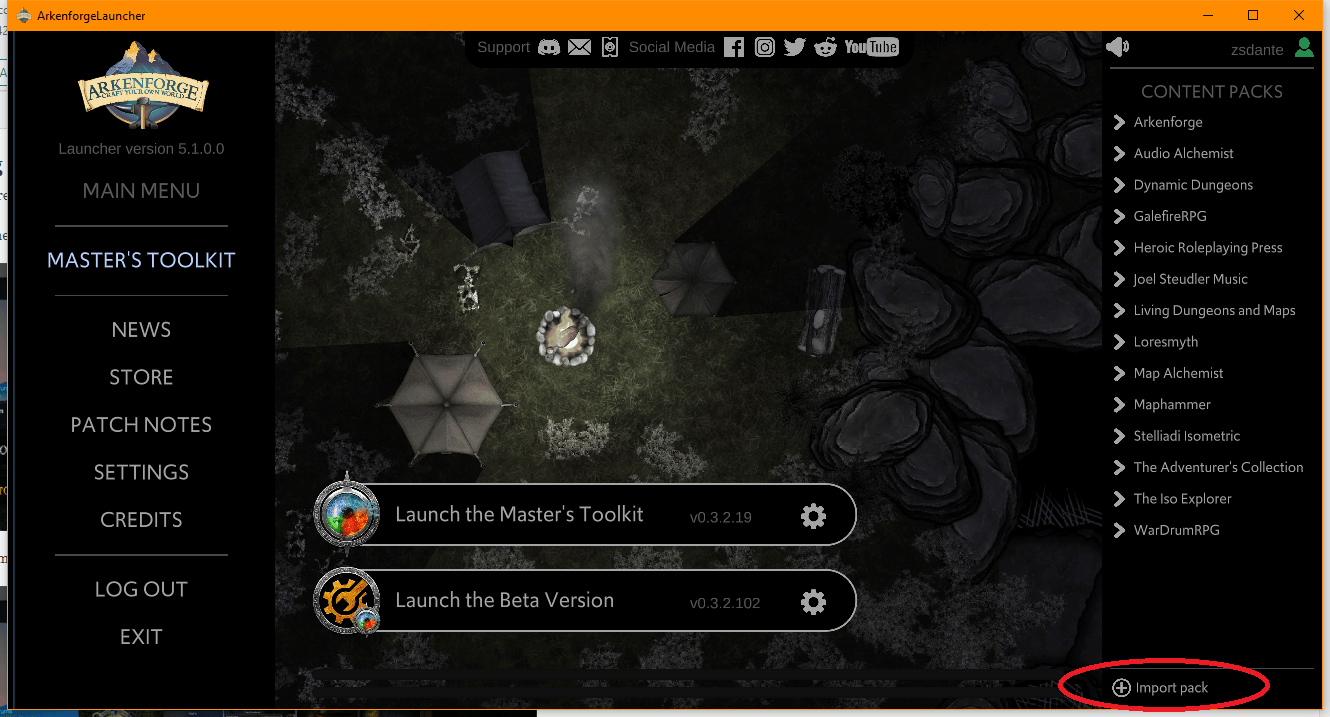
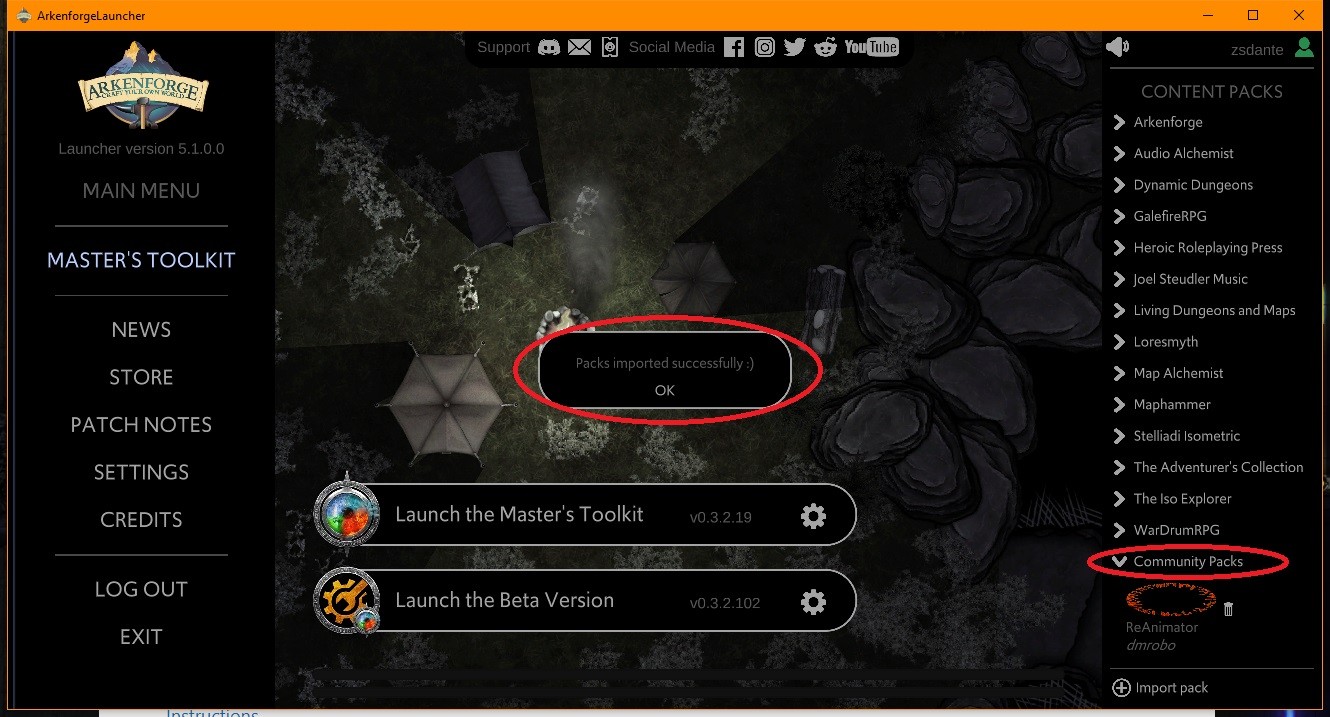
Step 1: Click on Import custom packs on the bottom :
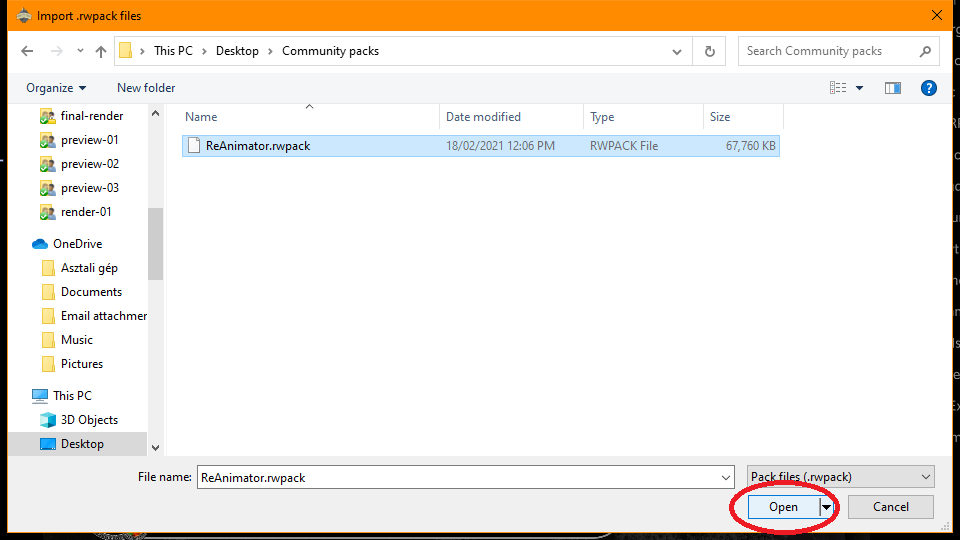
Step 2: If you downloaded Community packs, just navigate to your Downloads folder and select the pack files to import then click Open
Step 3: Check whether your Custom pack shows up in the list, if yes, launch the Master’s Toolkit :
Step 1: Open Arkenforge Launcher
Step 2: Click on the grey gear icon next to the Master’s Toolkit and click uninstall
Step 1: Open Arkenforge Launcher
Step 2: Click on the grey gear icon next to the Master’s Toolkit, and click repair
Step 1: After the purchase open your Launcher (if its already open, close and reopen it).
Step 2: Check whether your purchased pack shows up under the packs section with a black and white image:
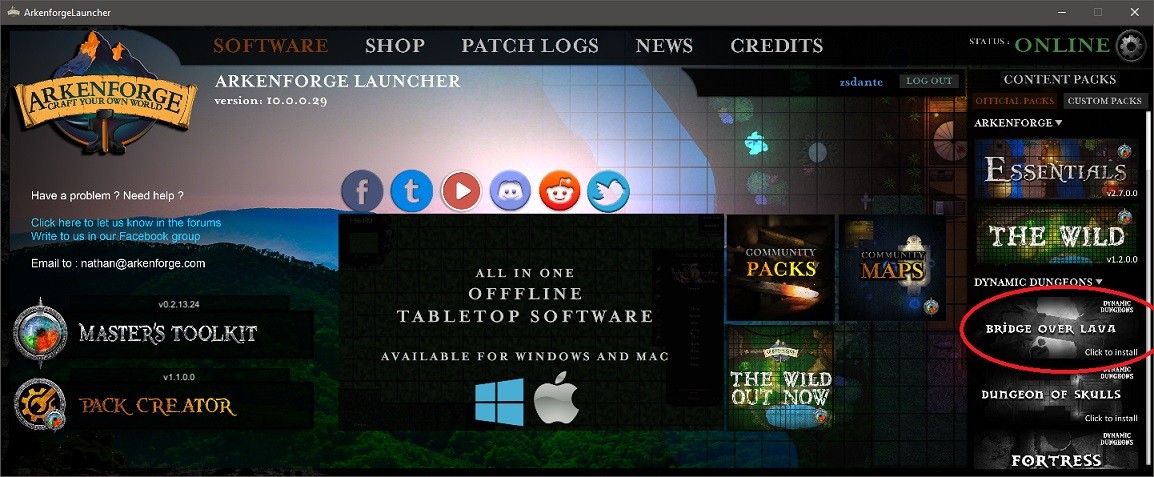
Step 3: Click on the image
Step 4: After the installation, the image will change to the coloured version, indicating that the Pack is ready to use
Masters Toolkit (9)
Minimum requirements :
Processor : Dual-core processor (64bit architecture)
GPU : Dedicated, possibly gaming capable graphics card : Nvidia GTX 700 series and up / AMD Radeon R7 series and up
RAM : 4GB
Recommended :
Processor : Quad-core processor (64bit architecture)
GPU : GTX 900 series and up / AMD Radeon R9 series and up
RAM : 8GB
Currently we support Paypal only.
As of Version 1.1, the Packs folder is located inside the PackCreator App. The easiest way to find it is to grab the install DMG, go to the utilities folder, and run the App that will make a shortcut in your Documents folder. (Thanks Leigh)
This is in a hidden Library folder. You can use Shift+Cmd+G and type ~/Library/Application Support/com.Arkenforge.ArkenforgeLauncher/ArkenforgeData, or, the easiest way to find it is to grab the install DMG, go to the utilities folder, and run the App that will make a shortcut in your Documents folder. (Thank you Leigh)
Step 1: Open Arkenforge Launcher
Step 2: Click on the grey gear icon next to the Master’s Toolkit and click uninstall
Step 3: Click on the Install Master’s Toolkit button to install
Step 6: Wait until Installation is completed
Importing the custom packs manually into the Master’s Toolkit
Once our pack is ready, we can import it via the Arkenforge Launcher.
Step 1: Click on Import custom packs on the bottom :
Step 2: If you downloaded Community packs, just navigate to your Downloads folder and select the pack files to import then click Open
Step 3: Check whether your Custom pack shows up in the list, if yes, launch the Master’s Toolkit :
Step 1: Open Arkenforge Launcher
Step 2: Click on the grey gear icon next to the Master’s Toolkit and click uninstall
Step 1: Open Arkenforge Launcher
Step 2: Click on the grey gear icon next to the Master’s Toolkit, and click repair
Windows launcher (8)
Minimum requirements :
Processor : Dual-core processor (64bit architecture)
GPU : Dedicated, possibly gaming capable graphics card : Nvidia GTX 700 series and up / AMD Radeon R7 series and up
RAM : 4GB
Recommended :
Processor : Quad-core processor (64bit architecture)
GPU : GTX 900 series and up / AMD Radeon R9 series and up
RAM : 8GB
Currently we support Paypal only.
Step 1: Open Arkenforge Launcher
Step 2: Click on the grey gear icon next to the Master’s Toolkit and click uninstall
Step 3: Click on the Install Master’s Toolkit button to install
Step 6: Wait until Installation is completed
Importing the custom packs manually into the Master’s Toolkit
Once our pack is ready, we can import it via the Arkenforge Launcher.
Step 1: Click on Import custom packs on the bottom :
Step 2: If you downloaded Community packs, just navigate to your Downloads folder and select the pack files to import then click Open
Step 3: Check whether your Custom pack shows up in the list, if yes, launch the Master’s Toolkit :
Step 1: Open Arkenforge Launcher
Step 2: Click on the grey gear icon next to the Master’s Toolkit and click uninstall
Step 1: Open Arkenforge Launcher
Step 2: Click on the grey gear icon next to the Master’s Toolkit, and click repair
Step 1: After the purchase open your Launcher (if its already open, close and reopen it).
Step 2: Check whether your purchased pack shows up under the packs section with a black and white image:

Step 3: Click on the image
Step 4: After the installation, the image will change to the coloured version, indicating that the Pack is ready to use
Macintosh Launcher (10)
Minimum requirements :
Processor : Dual-core processor (64bit architecture)
GPU : Dedicated, possibly gaming capable graphics card : Nvidia GTX 700 series and up / AMD Radeon R7 series and up
RAM : 4GB
Recommended :
Processor : Quad-core processor (64bit architecture)
GPU : GTX 900 series and up / AMD Radeon R9 series and up
RAM : 8GB
Currently we support Paypal only.
As of Version 1.1, the Packs folder is located inside the PackCreator App. The easiest way to find it is to grab the install DMG, go to the utilities folder, and run the App that will make a shortcut in your Documents folder. (Thanks Leigh)
This is in a hidden Library folder. You can use Shift+Cmd+G and type ~/Library/Application Support/com.Arkenforge.ArkenforgeLauncher/ArkenforgeData, or, the easiest way to find it is to grab the install DMG, go to the utilities folder, and run the App that will make a shortcut in your Documents folder. (Thank you Leigh)
Step 1: Open Arkenforge Launcher
Step 2: Click on the grey gear icon next to the Master’s Toolkit and click uninstall
Step 3: Click on the Install Master’s Toolkit button to install
Step 6: Wait until Installation is completed
Importing the custom packs manually into the Master’s Toolkit
Once our pack is ready, we can import it via the Arkenforge Launcher.
Step 1: Click on Import custom packs on the bottom :
Step 2: If you downloaded Community packs, just navigate to your Downloads folder and select the pack files to import then click Open
Step 3: Check whether your Custom pack shows up in the list, if yes, launch the Master’s Toolkit :
Step 1: Open Arkenforge Launcher
Step 2: Click on the grey gear icon next to the Master’s Toolkit and click uninstall
Step 1: Open Arkenforge Launcher
Step 2: Click on the grey gear icon next to the Master’s Toolkit, and click repair
Step 1: After the purchase open your Launcher (if its already open, close and reopen it).
Step 2: Check whether your purchased pack shows up under the packs section with a black and white image:

Step 3: Click on the image
Step 4: After the installation, the image will change to the coloured version, indicating that the Pack is ready to use

